We will create a sample project and execute TestNG tests using ANT build.xml. Before creating build.xml file, we will first create a project with some sample testng tests.
Before proceeding, please make sure you have installed ANT in your machine.
In Build.xml we will mainly see the below tags
1. project - Project is the staring point of the Ant configuration file and consists of the entire configuration with respect to building a project
2. target - A target is a set of tasks that that you want to execute during the build process.
3. task - Task is a piece of code that can be executed
4. property - Property tags are an important way to customize a build process or to provides way to define shortcuts to reuse repeatedly inside a build file
You can find more details of build file in Apache Ant manual
Step 1: Create a project
Step 2: Create sample packages as 'com.pack.one' and 'com.pack.two'
Step 3: Create multiple classes with in packages 'TestA' under 'com.pack.one' and 'TestB' under 'com.pack.two'
package com.pack.one;

import org.testng.annotations.AfterClass;
import org.testng.annotations.BeforeClass;
import org.testng.annotations.Test;

public class TestA {

	@BeforeClass
	public void setUp() {
		System.out.println("*** In class - Test A ***");
	}

	@Test
	public void testOne() {
		System.out.println("hello");
	}

	@Test
	public void testTwo() {
		System.out.println("hello");
	}

	@AfterClass
	public void tearDown() {
		System.out.println("*** End of class***");
	}
}
Create class 'TestB' under 'com.pack.two'
package com.pack.two;

import org.testng.annotations.AfterClass;
import org.testng.annotations.BeforeClass;
import org.testng.annotations.Test;

public class TestB {

	@BeforeClass
	public void setUp() {
		System.out.println("*** In class - Test B ***");
	}

	@Test
	public void testOne() {
		System.out.println("hello");
	}

	@Test
	public void testTwo() {
		System.out.println("hello");
	}

	@AfterClass
	public void tearDown() {
		System.out.println("*** End of class***");
	}
}
Step 4: Create testng.xml file and add the classes to test
<!DOCTYPE suite SYSTEM "http://testng.org/testng-1.0.dtd">
<suite name="Sample Test Suite">
<test name="Sample Test">
<classes>
<class name="com.pack.one.TestA"/>
<class name="com.pack.two.TestB"/>
</classes>
</test>
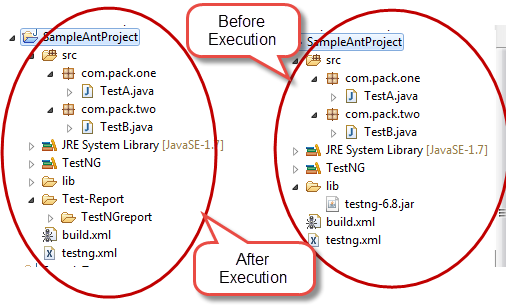
</suite>After following all the above steps, the project structure should look like below in the image. And after executing we will see the different project structure with reports folder getting created.
To create build.xml file, Right click on the project -> New -> File -> Enter the file name and Click on Finish button.
And the below is the build.xml file.
<project name="Sample Ant build" basedir=".">
<!-- ========== Initialize Properties =================================== -->
<!-- set global properties for build -->
<property name="basedir" value="." />
<property name="lib" value="${basedir}/lib" />
<property name="src" value="${basedir}/src" />
<property name="bin" value="${basedir}/bin" />
<property name="report-dir" value="${basedir}/Test-Report" />
<property name="testng-report-dir" value="${report-dir}/TestNGreport" />
<!-- ====== Set the classpath ==== -->
<path id="classpath">
<pathelement location="${bin}" />
<fileset dir="${lib}">
<include name="*.jar" />
</fileset>
</path>
<!-- Delete directories -->
<target name="delete-dir">
<delete dir="${bin}" />
<delete dir="${report-dir}" />
</target>
<!-- Creating directories -->
<target name="create" depends="delete-dir">
<mkdir dir="${bin}" />
<mkdir dir="${report-dir}" />
</target>
<!-- Compile the java code from ${src} into ${bin} -->
<target name="compile" depends="create">
<javac srcdir="${src}" classpathref="classpath" includeAntRuntime="No" destdir="${bin}" />
<echo> /* Compiled Directory Classes */ </echo>
</target>
<!-- Runs the file and generates Reportng report for TestNG-->
<taskdef name="testng" classname="org.testng.TestNGAntTask" classpathref="classpath" />
<target name="testng-execution" depends="compile">
<mkdir dir="${testng-report-dir}" />
<testng outputdir="${testng-report-dir}" classpathref="classpath" useDefaultListeners="true">
<xmlfileset dir="${basedir}" includes="testng.xml" />
</testng>
</target>
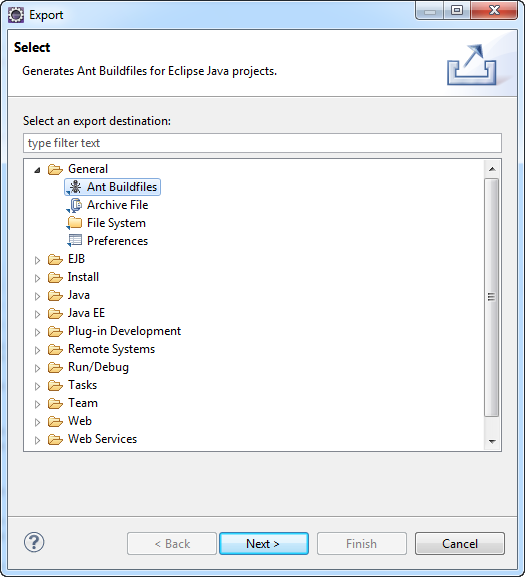
</project>You can also generate Select File -> click on Export -> General -> Ant Buildfiles and specify the file name, project, etc as per your needs.
When executing, you may encounter an issue as 'tools.jar' does not exists. This is because, You have installed Java Runtime Environment (JRE) instead of the Java Development Kit (JDK). JRE doesn't have a tools.jar, We need to set JAVA_HOME and PATH variables and point to JDK, not to JRE.
When you run an Ant build from Eclipse by right clicking and selecting Ant Build, you should see a message as ''BUILD SUCCESSFUL" as below:
Buildfile: D:\Ant\SampleAntProject\build.xml
BUILD SUCCESSFUL
Total time: 903 milliseconds
How to run TestNG using ANT
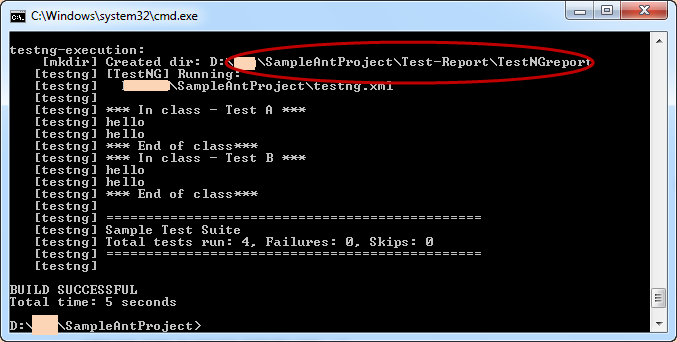
First Open the command and navigate to the respective project path in the system. Under that folder, we need to enter the below command
ant testng-executionNow it will show you the build.xml file that is getting executed and then it will compile and execute the TestNG tests. The below is the screen shot that you should observe.
Hope it helped you. Please let us know if you encounter any issues.
- ‹ Take Screenshot and place it in a folder with Test Class name
- Configuring ReportNG with ANT build.xml ›
Comments
Multiple testcase with annotations using build.xml
How to include the Data Provider annotations in build.xml. While running testng.xml, test result was success. But failed while running the testcases with data provider annotations.
Add new comment